이 전 글(Step 6th)에서 일정을 추가할 수 있는 영역인 ScheduleBottomSheet를 생성했습니다.
이번 스텝에서는 일정 추가를 위해 만들어 놓은 틀인 ScheduleBottomSheet에 입력 컴포넌트 위젯들을 추가해 보도록 하겠습니다.
일정 추가 입력하기
SceduleBottomSheet는 사용자가 새로 추가할 일정을 입력할 수 있는 위젯입니다.
시작 시간, 종료 시간, 일정 내용을 입력할 텍스트 필드 3개와 저장 버튼 하나로 구성하면 되겠습니다.
먼저 커스텀 텍스트 필드 위젯을 작성합니다.
lib/component/custom_text_field.dart
import 'package:flutter/material.dart';
import 'package:flutter/services.dart';
import 'package:planner_example/const/colors.dart';

class CustomTextField extends StatelessWidget {
  final String labelText; // 레이블 텍스트
  final bool isTime;  // 시간 관련 텍스트 필드 여부

  const CustomTextField({
    super.key,
    required this.labelText,
    this.isTime = false,
  });

  @override
  Widget build(BuildContext context) {
    return Column(
      crossAxisAlignment: CrossAxisAlignment.start,
      children: [
        Text(
          labelText,
          style: TextStyle(
            color: primaryColor,
            fontWeight: FontWeight.w600,
          ),
        ),
        Expanded(
          flex: isTime ? 0 : 1,
          child: TextFormField(
            cursorColor: Colors.grey, // 커서 색상
            maxLines: isTime ? 1 : null,  // 시간 관련 텍스트 필드는 한 줄로 제한
            expands: !isTime, // 시간 관련 텍스트 필드는 확장 가능
            keyboardType: isTime ? TextInputType.number : TextInputType.multiline,  // 시간 관련 텍스트 필드는 기본 숫자 키보드 아니면 일반 글자 키보드 보여주기
            inputFormatters: isTime ? [
              FilteringTextInputFormatter.digitsOnly,
            ] : [], // 시간 관련 텍스트 필드는 숫자만 입력하도록 제한
            decoration: InputDecoration(
              border: InputBorder.none, // 테두리를 없애겠다는 선언
              filled: true, // 배경색을 지정하겠다는 선언
              fillColor: Colors.grey[300],  // 배경색
              suffixText: isTime ? '시' : null, // 시간 관련 텍스트 필드는 '시' 접미사 추가
            ),
          ),
        ),
      ],
    );
  }
}
플러터(Flutter)에서 텍스트 필드는 TextField 위젯과 TextFormField로 나눌 수 있습니다.
TextFormField는 여러 개의 텍스트 필드를 하나의 폼으로 제어할 때 사용됩니다.
‘저장’버튼을 눌렀을 때 시간 텍스트 필드 2개와 내용 텍스트 필드 하나를 제어할 계획이니 TextFormField를 사용합니다.
maxLines 매개변수는 텍스트 필드에 값을 입력할 때 허락되는 최대 줄 개수입니다. Int값을 입력할 수 있으며 null을 넣으면 개수를 제한하지 않습니다.
expands 매개변수는 텍스트 필드를 부모 위젯 크기만큼 세로로 늘릴지 결정합니다.
keyboardType 매개변수는 텍스트 필드를 선택했을 때 화면에 어떤 키보드가 보여질지 선택할 수 있습니다.
InputFormatter 매개변수는 텍스트 필드에 입력되는 값들을 제한할 수 있습니다. keyboardType 매개변수와 비슷해 보이지만 큰 차이가 있습니다.
keyboardType 매개변수는 핸드폰에서 보여주는 키보드만 제한할 수 있고 블루투스 키보드나 보안 키보드처럼 커스텀 구현된 키보드를 사용할 때는 입력을 제한할 수 없습니다. InputFormatter 매개변수의 경우 특정 입력 자체를 제한할 수 있습니다. 리스트로 원하는 만큼 제한을 넣어줄 수 있습니다.
sufix 매개변수는 접미사를 지정할 수 있습니다.
lib/component/schedule_bottom_sheet.dart
import 'package:flutter/material.dart';
import 'package:planner_example/const/colors.dart';
import 'package:planner_example/component/custom_text_field.dart';

class ScheduleBottomSheet extends StatefulWidget {
  const ScheduleBottomSheet({super.key});

  @override
  State<ScheduleBottomSheet> createState() => _ScheduleBottomSheetState();
}

class _ScheduleBottomSheetState extends State<ScheduleBottomSheet> {
  @override
  Widget build(BuildContext context) {
    return SafeArea(
      child: Container(
        height: MediaQuery.of(context).size.height * 0.5,
        color: Colors.white,
        child: Padding(
          padding: const EdgeInsets.only(left: 8, right: 8, top: 8),
          child: Column(
            crossAxisAlignment: CrossAxisAlignment.start,
            children: [
              Row(
                mainAxisAlignment: MainAxisAlignment.spaceBetween,
                children: [
                  Expanded(
                    child: CustomTextField(labelText: '시작 시간', isTime: true),
                  ),
                  SizedBox(width: 16.0),
                  Expanded(
                    child: CustomTextField(labelText: '종료 시간', isTime: true),
                  ),
                ],
              ),
              SizedBox(height: 8.0),
              Expanded(child: CustomTextField(labelText: '내용', isTime: false)),
              SizedBox(
                width: double.infinity,
                child: ElevatedButton(
                  onPressed: onSavePressed,
                  style: ElevatedButton.styleFrom(
                    foregroundColor: Colors.white,
                    backgroundColor: primaryColor,
                  ),
                  child: Text('저장'),
                ),
              ),
            ],
          ),
        ),
      ),
    );
  }

  void onSavePressed() {}
}
시작 시간과 종료 시간을 입력할 텍스트 필드는 하나의 Row 위젯 안에 좌우로 펼쳐지게 합니다. 해당 Row 위젯을 Column 위젯에 한 번 더 감싸서 내용을 담는 텍스트 필드가 남는 공간을 모두 차지하게 합니다.
실행화면
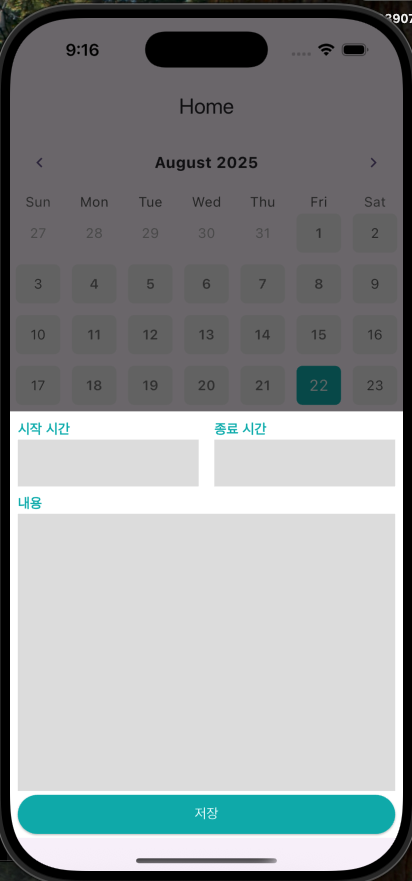
이번 글에서는 ScheduleBottomSheet 안에 내용을 채워보았습니다.
다음 글에서는 약간의 디테일을 보완하는 내용을 기록해 보도록 하겠습니다.