이 전 글에 이어서 UI 개발을 진행해 보도록 하겠습니다.
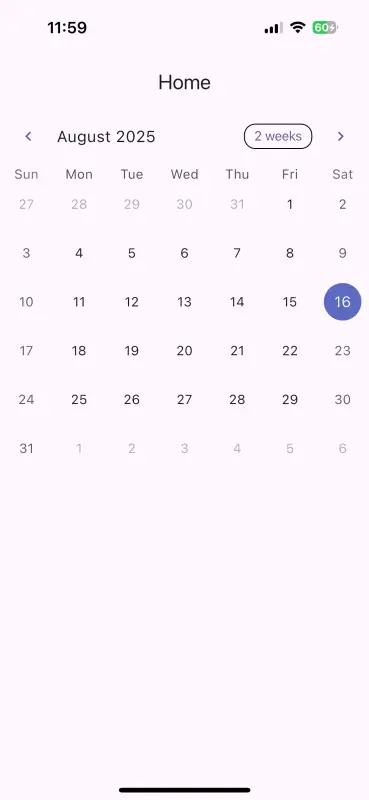
우선 이번 스텝에서는 기본 달력을 띄워보는 것까지 기록해 보겠습니다.
주색상 선언
앱에서 사용할 주색상들을 선언할 파일을 만듭니다.
파일은 main.dart가 있는 lib 폴더를 기준으로 “lib/const/colors.dart”이라는 경로와 이름으로 만들겠습니다.
주색상은 초록색, 옅은 회색, 어두운 회색 그리고 텍스트 필드 배경색을 선언해 주겠습니다.
lib/const/colors.dart
import 'package:flutter/material.dart';

const Color primaryColor = Color(0xFF0DB2B2);
final Color lightGrayColor = Colors.grey[200]!;
final Color darkGrayColor = Colors.grey[600]!;
final Color textFieldFillColor = Colors.grey[300]!;
달력 구현
HomeScreen 화면 윗부분의 달력을 MainCalendar 클래스로 만듭니다. 달력은 ‘pubspec.yaml’에 추가한 table_calendar 플러그인을 사용합니다.
lib/component/main_calendar.dart
import 'package:flutter/material.dart';
import 'package:table_calendar/table_calendar.dart';

class MainCalendar extends StatelessWidget {
  const MainCalendar({super.key});

  @override
  Widget build(BuildContext context) {
    return TableCalendar(
      focusedDay: DateTime.now(), // 현재 날짜
      firstDay: DateTime.now().subtract(const Duration(days: 3650)),  // 첫 번째 날짜
      lastDay: DateTime.now().add(const Duration(days: 3650)),  // 마지막 날짜
      selectedDayPredicate: (DateTime day) {
        final now = DateTime.now();
        return DateTime(day.year, day.month, day.day) ==
            DateTime(now.year, now.month, now.day);
      },
      onDaySelected: (DateTime selectedDay, DateTime focusedDay) {
        // Handle day selection
      },
      onPageChanged: (focusedDay) {
        // Handle page change
      },
      rangeSelectionMode: RangeSelectionMode.toggledOff,
      onRangeSelected: (start, end, focusedDay) {
        // Handle range selection
      },
    );
  }
}
lib/screen/home_screen.dart
import 'package:flutter/material.dart';
import 'package:planner_example/component/main_calendar.dart';

class HomeScreen extends StatelessWidget {
  const HomeScreen({super.key});

  @override
  Widget build(BuildContext context) {
    return Scaffold(
      appBar: AppBar(title: const Text('Home')),
      body: SafeArea(
        child: Column(
          children: [
            MainCalendar(),
          ],
        ),
      ),
    );
  }
}
lib/main.dart
import 'package:flutter/material.dart';
import 'package:planner_example/screen/home_screen.dart';

void main() {
  runApp(const MyApp());
}

class MyApp extends StatelessWidget {
  const MyApp({super.key});

  // This widget is the root of your application.
  @override
  Widget build(BuildContext context) {
    return MaterialApp(
      debugShowCheckedModeBanner: false,
      title: 'Flutter Demo',
      theme: ThemeData(
        // This is the theme of your application.
        //
        // TRY THIS: Try running your application with "flutter run". You'll see
        // the application has a purple toolbar. Then, without quitting the app,
        // try changing the seedColor in the colorScheme below to Colors.green
        // and then invoke "hot reload" (save your changes or press the "hot
        // reload" button in a Flutter-supported IDE, or press "r" if you used
        // the command line to start the app).
        //
        // Notice that the counter didn't reset back to zero; the application
        // state is not lost during the reload. To reset the state, use hot
        // restart instead.
        //
        // This works for code too, not just values: Most code changes can be
        // tested with just a hot reload.
        colorScheme: ColorScheme.fromSeed(seedColor: Colors.deepPurple),
      ),
      // home: const MyHomePage(title: 'Flutter Demo Home Page'),
      home: const HomeScreen(),
    );
  }
}
실행화면