이 전 글(Step 5th)에서 일정을 보여주는 카드 디자인의 위젯을 작성했습니다.
이번 스텝에서는 달력과 일정 카드 위젯 사이에 선택된 날짜를 보여주는 배너 형태의 위젯을 하나 추가해 보도록 하겠습니다.
그리고 FloatingActionButton을 추가하고 터치시 일정을 추가하는 ScheduleBottomSheet가 나타나도록 구현해 보겠습니다.
일정을 추가할 ScheduleBottomSheet와 그것을 호출하는 FloatingActionButton 추가
ScheduleBottomSheet 내부의 입력 위젯들은 다음 글에서 작성하도록 하고 이번 글에서는 우선 ScheduleBottomSheet의 틀만 잡아주고 그것을 호출하는 FloatingActionButton을 추가하는 코드를 작성해 보겠습니다.
참 그리고 선택된 날짜를 보여주는 위젯을 구현하는 코드도 함께 작성하겠습니다.
lib/component/day_banner.dart
import 'package:flutter/material.dart';
import 'package:planner_example/const/colors.dart';

class DayBanner extends StatelessWidget {
  final DateTime date;
  final int count;

  const DayBanner({super.key, required this.date, required this.count});

  @override
  Widget build(BuildContext context) {
    // 기본 텍스트 스타일
    final textStyle = TextStyle(
      fontWeight: FontWeight.w600,
      color: count > 0 ? Colors.white : darkGrayColor,
    );

    return Container(
      color: primaryColor,
      padding: const EdgeInsets.symmetric(horizontal: 16.0, vertical: 8.0),
      child: Row(
        children: [
          Text(
            '${date.year}년 ${date.month}월 ${date.day}일',
            style: textStyle,
          ),
          Text(
            '$count개',
            style: textStyle,
          ),
        ],
      ),
    );
  }
}
DayBanner 위젯은 선택된 날짜와 해당하는 일정 개수를 부모 위젯에서 입력받아 표시하도록 변수들을 선언합니다.
이제 다음은 ScheduleBottomSheet를 작성합니다.
lib/component/schedule_bottom_sheet.dart
import 'package:flutter/material.dart';

class ScheduleBottomSheet extends StatefulWidget {
  const ScheduleBottomSheet({super.key});

  @override
  State<ScheduleBottomSheet> createState() => _ScheduleBottomSheetState();
}

class _ScheduleBottomSheetState extends State<ScheduleBottomSheet> {
  @override
  Widget build(BuildContext context) {
    return SafeArea(
      child: Container(
        height: MediaQuery.of(context).size.height * 0.5,
        color: Colors.white,
      ),
    );
  }
}
우선은 화면의 반을 차지할 수 있는 ScheduleBottomSheet의 틀을 만들었습니다.
다음은 HomeScreen에 이 ScheduleBottomSheet를 호출할 수 있는 FloatingActionButton과 아까 만든 DayBanner를 추가하겠습니다.
lib/screen/home_screen.dart
import 'package:flutter/material.dart';
import 'package:planner_example/component/day_banner.dart';
import 'package:planner_example/component/main_calendar.dart';
import 'package:planner_example/component/schedule_bottom_sheet.dart';
import 'package:planner_example/component/schedule_card.dart';
import 'package:planner_example/const/colors.dart';

class HomeScreen extends StatefulWidget {
  const HomeScreen({super.key});

  @override
  State<HomeScreen> createState() => _HomeScreenState();
}

class _HomeScreenState extends State<HomeScreen> {
  DateTime selectedDay = DateTime.now();

  void onDaySelected(DateTime selectedDay, DateTime focusedDay) {
    setState(() {
      this.selectedDay = selectedDay;
    });
  }

  @override
  Widget build(BuildContext context) {
    return Scaffold(
      appBar: AppBar(title: const Text('Home')),
      floatingActionButton: FloatingActionButton(
        backgroundColor: primaryColor,
        onPressed: () {
          showModalBottomSheet(
            context: context,
            isDismissible: true,  // 배경 클릭 시 닫기
            builder: (context) => const ScheduleBottomSheet(),
          );
        },
        child: const Icon(Icons.add),
      ),
      body: SafeArea(
        child: Column(
          children: [
            MainCalendar(
              selectedDay: selectedDay,
              onDaySelected: onDaySelected,
            ),
            SizedBox(height: 8.0),
            DayBanner(date: selectedDay, count: 0),
            SizedBox(height: 8.0),
            ScheduleCard(content: 'Sample Schedule', startTime: 9, endTime: 10),
          ],
        ),
      ),
    );
  }
}
- floatingActionButton 매개변수에 FloatingActionButton 위젯을 입력해 주고 bottom. sheet를 실행하는 showModalBottomSheet() 함수를 이용해서 ScheduleBottomSheet 위젯을 bottom sheet로 실행합니다.
- showModalBottomSheet의 isDismissible 매개변수에 true를 사용해서 배경을 눌렀을 때 ScheduleBottomSheet가 닫히도록 하였습니다.
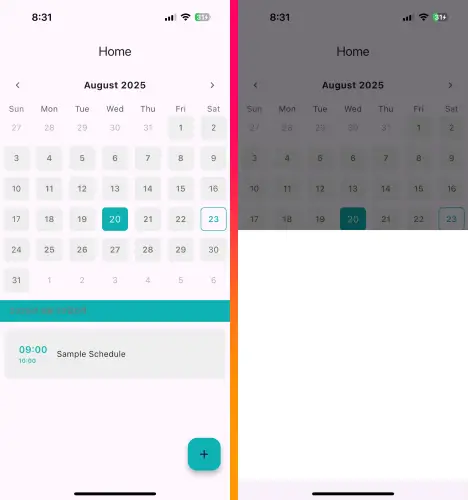
실행화면
이제 다음 글에서 추가할 일정을 입력하는 UI를 만들어 보겠습니다. 😊